SSM
概念
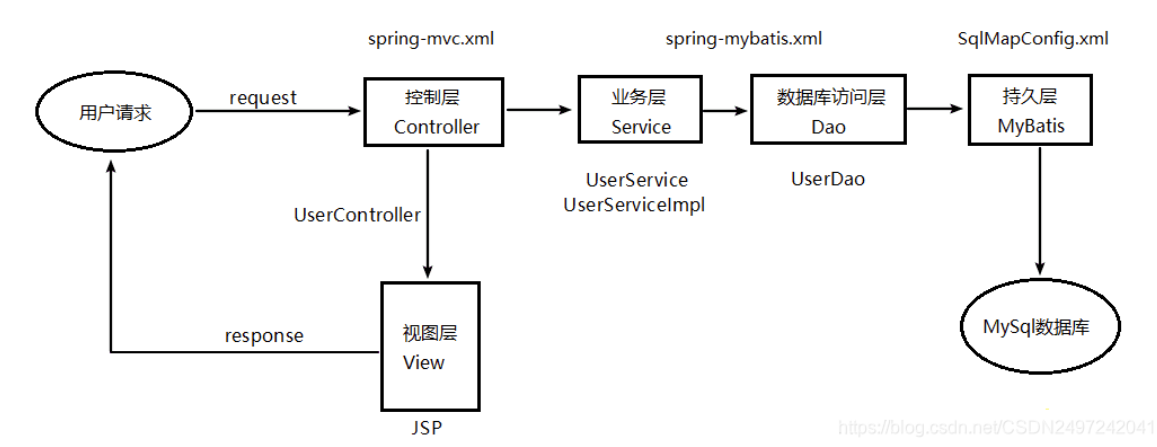
Java SSM框架即指Spring+SpringMVC+MyBatis的简称,框架集由Spring、MyBatis两个开源框架整合而成(SpringMVC是Spring中的部分内容),常作为数据源较简单的web项目的框架。
相比于之前的SSH(Spring+Struts+Hibernate),SSM更加轻量化和灵活,是目前业界主流的Java Web开发框架。
Spring是一个轻量级的控制反转(IoC)和面向切面(AOP)的容器框架。Spring的核心思想是IoC(控制反转),即不再需要程序员去显式地new一个对象,而是让Spring框架帮你来完成这一切;而重要功能Aop(面向切面编程)能够将那些与业务无关,却为业务模块所共同调用的逻辑或责任(例如事务处理、日志管理、权限控制等)封装起来,在系统的业务流程代码中需要的位置切入这些通用功能代码,以便于减少系统的重复代码,有利于项目未来的可拓展性和可维护性。
Spring MVC属于SpringFrameWork的后续产品,已经融合在Spring Web Flow里面。SpringMVC把传统的模型层被拆分为了业务层(Service)和数据访问层(DAO,Data Access Object)。在业务层中可以通过 Spring 的声明式事务操作数据访问层,而在业务层上还允许我们访问 NoSQL ,这样就能够满足异军突起的 NoSQL 的使用了,它可以大大提高互联网系统的性能。
MyBatis 是一款优秀的Java持久层框架,它支持定制化 SQL、存储过程以及高级映射。MyBatis 消除了几乎所有的JDBC代码和参数的手工设置以及结果集的检索。MyBatis 使用简单的 XML配置文件或注解,将接口和 Java 的POJOs(Plain Old Java Objects,普通的 Java对象)映射成数据库中的记录。
获取数据
控制器
// 声明当前类所属的包,通常按项目结构组织,com.qcby.controller 表示这是控制器层
package com.qcby.controller;

// 导入 Student 实体类,用于封装学生信息(如 id、name 等属性)
import com.qcby.entity.Student;
// 导入 Student1Service 接口,用于调用业务逻辑层的方法
import com.qcby.service.Student1Service;

// 导入 Spring 的自动装配注解,用于依赖注入(将 Service 层实例注入到 Controller 中)
import org.springframework.beans.factory.annotation.Autowired;
// @Controller 注解标识该类为 Spring MVC 的控制器组件,会被 Spring 容器管理
import org.springframework.stereotype.Controller;
// @RequestMapping 用于映射 HTTP 请求路径到控制器方法
import org.springframework.web.bind.annotation.RequestMapping;
// @RequestParam 用于绑定请求参数到方法参数上
import org.springframework.web.bind.annotation.RequestParam;

// 导入 HttpServletRequest,用于直接获取原始 HTTP 请求中的参数(传统 Servlet 方式)
import javax.servlet.http.HttpServletRequest;

// @Controller:将此类注册为 Spring MVC 的控制器 Bean,Spring 会自动扫描并管理它
@Controller
// @RequestMapping("/student1"):为整个控制器类设置一个公共的 URL 前缀
// 所有该类中的方法路径都会以 /student1 开头,例如 /student1/add
@RequestMapping("/student1")
public class Student1Controller {

    // @Autowired:自动从 Spring 容器中查找类型为 Student1Service 的 Bean,
    // 并注入到该字段中(实现控制反转 IoC 和依赖注入 DI)
    // 注意:字段名 student1Service1 与接口名不一致,但只要容器中有唯一匹配的实现类即可注入成功
    @Autowired
    private Student1Service student1Service;

    // ==================== 方式一:使用原生 HttpServletRequest 获取参数 ====================
    // @RequestMapping("/add"):映射 /student1/add 路径到此方法
    // 当用户访问 http://.../student1/add?name=张三&id=1001 时,会执行此方法
    @RequestMapping("/add")
    public void add(HttpServletRequest request) {
        // 通过 request.getParameter("name") 获取 URL 或表单中名为 "name" 的参数值
        String name = request.getParameter("name");
        // 同理,获取 "id" 参数
        String id = request.getParameter("id");
        // 打印接收到的参数,用于调试或日志记录
        System.out.println("/add接收到name: " + name + ", id: " + id);
    }

    // ==================== 方式二:使用 @RequestParam 自动绑定请求参数(推荐方式)====================
    // Spring MVC 会自动将请求中的参数与方法参数按名称匹配
    // @RequestParam("name") 表示将请求参数 "name" 的值绑定到 String name 变量
    // 若参数名与方法参数名一致,可省略 value 属性,如 @RequestParam String name
    @RequestMapping("/add1")
    public void add1(@RequestParam("name") String name, @RequestParam("id") String id) {
        // 直接使用已绑定的参数,无需手动解析 request
        System.out.println("add1接收到name: " + name + ", id: " + id);
    }

    // ==================== 方式三:使用对象封装自动绑定(最常用且简洁的方式)====================
    // Spring MVC 支持将多个请求参数自动封装到一个 JavaBean 对象中
    // 前提:请求参数名(如 name, id)必须与 Student 类的属性名一致,并有对应的 setter 方法
    // 注意:方法参数直接写成 Student stu,Spring 会自动创建 Student 对象并填充属性
    // 也可以写成 add2(String name, String id),Spring 同样能绑定,但对象封装更利于扩展
    @RequestMapping("/add2")
    public void add2(Student stu) {
        // 打印封装后的 Student 对象(需 Student 类重写 toString() 方法以便友好输出)
        System.out.println("/接收到对象: " + stu.toString());
        // 调用 Service 层的 add 方法,将学生对象传递给业务逻辑层进行处理(如保存到数据库)
        student1Service.add(stu);
    }
}
服务层
// 声明当前接口所属的包,com.qcby.service 表示这是服务层(业务逻辑层)
package com.qcby.service;

// 导入 Student 实体类,用于定义方法参数类型
import com.qcby.entity.Student;

// 定义一个名为 Student1Service 的公共接口
// 在 SSM(Spring + Spring MVC + MyBatis)架构中,Service 层负责处理业务逻辑,
// 通常由接口和其实现类组成,便于解耦和使用 Spring 的代理机制(如事务管理)
public interface Student1Service {

    // 声明一个公共方法 add,接收一个 Student 类型的对象作为参数
    // 该方法用于添加学生信息,具体实现由其实现类(如 Student1ServiceImpl)提供
    // 使用 void 表示该方法不返回任何值(实际开发中也可能返回主键、布尔值或自定义结果)
    public void add(Student student);
}
// 声明当前类所属包,com.qcby.service.Impl 表示这是服务层的实现类(通常命名为 impl 或 Impl)
// 注意:包名建议使用小写(如 com.qcby.service.impl),但 Java 允许大写,仅不符合常规命名规范
package com.qcby.service.Impl;

// 导入 Student 实体类,用于方法参数类型
import com.qcby.entity.Student;
// 导入 Student1Service 接口,当前类将实现该接口定义的业务方法
import com.qcby.service.Student1Service;

// 导入 Spring 的 @Service 注解,用于标识业务逻辑层组件
import org.springframework.stereotype.Service;

// @Service:将此类注册为 Spring 容器中的一个 Service 层 Bean
// value = "student1Service" 指定了该 Bean 的唯一名称(id)
// 这样在 Controller 中通过 @Autowired + 字段名 "student1Service" 或 @Qualifier("student1Service") 可精确注入
// 若不指定名称,Spring 默认使用类名首字母小写(即 student1ServiceImpl)作为 Bean 名称
@Service("student1Service")
public class Student1ServiceImpl implements Student1Service {

    @Override
    public void add(Student student) {
        System.out.println("Student1ServiceImpl.add");
        System.out.println(student);
    }
}
操作数据库
在jdbc.properties里添加数据库连接信息,然后在dao里创建数据库接口,最后在mapping中添加xml表语句即可实现查询。
<?xml version="1.0" encoding="UTF-8"?>
<!--
  声明 XML 文档版本和字符编码,UTF-8 支持中文等多语言字符,避免乱码。
-->

<!DOCTYPE mapper PUBLIC
  "-//mybatis.org//DTD Mapper 3.0//EN"
  "http://mybatis.org/dtd/mybatis-3-mapper.dtd">
<!--
  引入 MyBatis 官方提供的 DTD(Document Type Definition)约束文件,
  用于校验本 XML 文件的结构是否符合 MyBatis Mapper 3.0 规范。
  公共标识符(PUBLIC ID)为 "-//mybatis.org//DTD Mapper 3.0//EN",
  系统标识符(SYSTEM ID)指向在线 DTD 文件地址。
-->

<!--
  <mapper> 是 MyBatis 映射文件的根元素。
  namespace 属性必须指定,且值应为对应 DAO 接口(Mapper 接口)的全限定类名。
  此处表示该映射文件与 com.qcby.dao.StudentMapper 接口绑定,
  MyBatis 会通过动态代理为该接口生成实现类,并将 SQL 语句与接口方法关联。
-->
<mapper namespace="com.qcby.dao.StudentMapper">

  <!--
    <resultMap> 用于定义数据库结果集(ResultSet)到 Java 对象的映射规则。
    id="BaseResultMap":该 resultMap 的唯一标识,在 SQL 中可通过 resultMap="BaseResultMap" 引用。
    type="com.qcby.entity.Student":指定映射目标为 Student 实体类(需有无参构造函数和 setter 方法)。
  -->
  <resultMap id="BaseResultMap" type="com.qcby.entity.Student">
    <!--
      <id> 标签用于映射主键字段,有助于 MyBatis 优化缓存和对象比较。
      column="id":数据库表中的列名。
      jdbcType="INTEGER":指定 JDBC 类型,防止 NULL 值导致类型错误(可选但推荐)。
      property="id":Student 实体类中的属性名(需与 getter/setter 匹配)。
    -->
    <id column="id" jdbcType="INTEGER" property="id" />

    <!--
      <result> 标签用于映射普通字段(非主键)。
      此处将数据库列 studentName 映射到 Student 的 studentName 属性。
      注意:若数据库列名与实体属性名完全一致(如都叫 name),可省略 resultMap,MyBatis 会自动映射。
      但此处列名为 studentName,假设实体属性也是 studentName,则可自动映射;保留是为了显式控制或处理不一致情况。
    -->
    <result column="studentName" jdbcType="VARCHAR" property="studentName" />
    <result column="studentSex" jdbcType="VARCHAR" property="studentSex" />
  </resultMap>

  <!--
    <sql> 片段用于定义可重用的 SQL 代码块,提高维护性。
    id="Base_Column_List":片段名称,可在其他 SQL 语句中通过 <include refid="Base_Column_List"/> 引用。
    内容为数据库表中常用的查询字段列表(通常与 resultMap 中的字段对应)。
  -->
  <sql id="Base_Column_List">
    id, studentName, studentSex
  </sql>

  <!--
    当前文件尚未定义具体的 CRUD 语句(如 <select>, <insert> 等),
    但已准备好基础映射和字段列表,后续可在此基础上添加。
    例如:
    <insert id="insert" parameterType="com.qcby.entity.Student">
      INSERT INTO student (id, studentName, studentSex)
      VALUES (#{id}, #{studentName}, #{studentSex})
    </insert>
  -->

</mapper>
自动生成
mvn mybatis-generator:generate
比较难用, 配置较复杂
面试点
@Bean和@Component的区别
| 维度 | | |
| 作用位置 | 类上(Class-level) | 方法上(Method-level) |
| 注册方式 | 自动装配(配合 | 手动声明(在 |
| 控制粒度 | 整个类作为一个 Bean | 方法返回值作为 Bean,可精细控制构造逻辑 |
| 适用场景 | 自定义组件(Service、DAO、Controller 等) | 第三方类、需要复杂初始化逻辑的 Bean |
场景一:你无法给类加 @Service(第三方库)
问题
你想用 RestTemplate 发 HTTP 请求,但它是 Spring 提供的类,你不能修改它的源码去加 @Service。
这是 Spring 的类,你不能改它!
public class RestTemplate { ... }解决方案:用 @Bean
@Configuration
public class WebConfig {

    @Bean
    public RestTemplate restTemplate() {
        return new RestTemplate();
    }
}
使用方式
@Service
public class UserService {

    // 自动注入你通过 @Bean 创建的 RestTemplate
    @Autowired
    private RestTemplate restTemplate;

    public void callExternalApi() {
        String result = restTemplate.getForObject("https://api.example.com/users", String.class);
        System.out.println(result);
    }
}
如果没有 @Bean,你就无法把 RestTemplate 交给 Spring 管理,也就不能用 @Autowired 注入!
场景二:需要传参或复杂初始化逻辑
问题
你的 NotificationService 需要一个 API 密钥才能工作,这个密钥来自配置文件:
public class NotificationService {
    private String apiKey;

    public NotificationService(String apiKey) {
        this.apiKey = apiKey;
    }

    public void send(String msg) {
        // 调用第三方推送服务
    }
}
你不能这样写:
@Service
public class NotificationService {
    // ❌ Spring 默认调用无参构造器,但这里没有!
}
解决方案:用 @Bean + @Value
@Configuration
public class ServiceConfig {

    @Bean
    public NotificationService notificationService(@Value("${push.api-key}") String apiKey) {
        return new NotificationService(apiKey); // 手动传参!
    }
}
application.properties
push.api-key=sk-1234567890abcdef这样就能把配置值传入构造函数,而 @Service 做不到这一点(除非你用 @PostConstruct,但更麻烦)。
场景三:同一个类,需要多个不同配置的实例
问题
你需要两个 DataSource:
- 一个连接 主数据库
- 一个连接 报表数据库
但 DataSource 是接口,实现类是 HikariDataSource(第三方),你不能加 @Service。
解决方案:用 @Bean 定义两个 Bean
@Configuration
public class DataSourceConfig {

    @Bean
    @Primary // 默认注入这个
    public DataSource primaryDataSource() {
        HikariDataSource ds = new HikariDataSource();
        ds.setJdbcUrl("jdbc:mysql://localhost:3306/main_db");
        return ds;
    }

    @Bean
    @Qualifier("reportDataSource") // 用名字区分
    public DataSource reportDataSource() {
        HikariDataSource ds = new HikariDataSource();
        ds.setJdbcUrl("jdbc:mysql://localhost:3306/report_db");
        return ds;
    }
}
使用方式
@Service
public class ReportService {

    // 注入主库
    @Autowired
    private DataSource primaryDataSource;

    // 注入报表库
    @Autowired
    @Qualifier("reportDataSource")
    private DataSource reportDataSource;
}
@Service 只能注册一个实例,无法满足“多实例”需求。
场景四:条件化创建 Bean(高级用法)
问题
只在开发环境启用 Mock 服务,生产环境用真实服务。
解决方案:@Bean + @Profile
@Configuration
public class ServiceConfig {

    @Bean
    @Profile("dev")
    public EmailService emailService() {
        return new MockEmailService(); // 不发真实邮件
    }

    @Bean
    @Profile("!dev")
    public EmailService emailService() {
        return new RealEmailService("smtp.example.com");
    }
}
@Service 无法根据环境动态决定是否注册!